If you’re looking to serve the perfect baked turkey this holiday season, starting with a fresh, locally-sourced bird is key. Picking up your turkey from a local farm supports your community and guarantees a fresh, high-quality bird. This guide will walk you through each step, from selecting and storing your turkey to prepping, seasoning, and roasting it to perfection. With these steps, you’ll be ready to serve the perfect baked turkey with all the flavor and juiciness you’re hoping for.
Step 1: Pick Up Your Turkey from a Local Farm
For the perfect baked turkey, sourcing your bird from a local farm ensures it’s fresh and often tastier than store-bought options. Local farmers generally raise turkeys without unnecessary additives, providing a more natural, flavorful bird.
- Choose the Right Size: A good rule of thumb is to plan for 1 to 1.5 pounds per person. So, for a gathering of ten, a 10-15 pound turkey should be perfect.
- Ask the Farmer for Tips: Many local farmers are more than happy to share storage and prep tips to help you get the best flavor.
Step 2: Storing Your Turkey
If you pick up your turkey a day or two before cooking, store it properly to keep it fresh.
- Refrigerate Immediately: Place the turkey in the coldest part of your refrigerator, ideally below 40°F. Keep it in its original wrapping to retain freshness.
- Avoid Storing Too Long: For the freshest results, don’t store the turkey for more than two days before cooking. If you need to keep it longer, ask your farmer about freezing options.
Step 3: Clean and Prepare Your Turkey
Cleaning and preparing the turkey is essential for the perfect baked turkey.
- Rinse the Bird: Remove the giblets and neck from the cavity (these can be used to make stock). Rinse the turkey inside and out with cold water, then pat dry with paper towels.
- Trim Excess Skin and Fat: Some turkeys have extra skin around the neck or fat in the cavity that can be trimmed off for a cleaner finish.
Step 4: Season the Turkey for Flavor and Moisture
Seasoning is where the magic happens! The key to the perfect baked turkey is a flavorful blend that keeps the meat moist and delicious.
- Herb Butter Mixture: Combine softened butter with fresh herbs like rosemary, thyme, sage, salt, pepper, and minced garlic.
- Rub Under and Over the Skin: Carefully lift the skin over the breast and spread half the butter mixture underneath. Rub the remaining butter on the skin’s surface.
- Inside the Cavity: Season the inside with salt, pepper, and a handful of aromatic ingredients like quartered onions, garlic cloves, apple slices, oranges, lemons, and fresh herbs.
Step 5: Truss the Turkey
Trussing (tying up) your turkey ensures even cooking and helps the turkey maintain its shape.
- Tie the Legs Together: Use kitchen twine to secure the legs. This helps the turkey cook evenly.
- Tuck the Wings: Tuck the wings underneath the body to prevent burning.
Step 6: Choose the Right Roasting Pan
For the perfect baked turkey, a sturdy roasting pan with a rack is ideal. The rack elevates the turkey, allowing air to circulate and helps the bird cook evenly.
- Optional Rack: Place the turkey breast side up on a roasting rack inside a large pan. If you don’t have a rack, create a layer of vegetables under the turkey to elevate it slightly.
Step 7: Baking Instructions
Now that your turkey is prepped, it’s time to bake! Follow these steps to achieve a juicy, golden-brown turkey.
- Preheat the Oven: Set your oven to 325°F for slow and even cooking.
- Cover and Cook: Cover the turkey loosely with aluminum foil to retain moisture. Place it in the oven and bake according to its weight, generally about 15-20 minutes per pound. For example, a 12-pound turkey will need approximately 3-4 hours.
- Remove the Foil for the Last Hour: To achieve a golden, crispy skin, uncover the turkey for the final hour of baking.
- Check the Temperature: The perfect baked turkey is ready when the internal temperature reaches 165°F in the thickest part of the breast and thigh. Use a meat thermometer to ensure accuracy.
Step 8: Let the Turkey Rest
Once the turkey reaches 165°F, remove it from the oven and let it rest for at least 20-30 minutes. Resting allows the juices to redistribute, resulting in a juicy, tender bird.
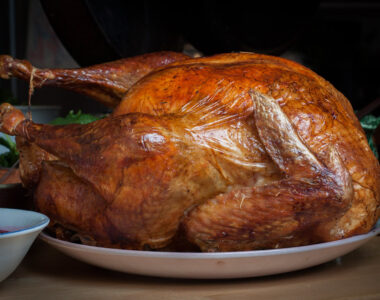
Step 9: Carve and Serve
Now it’s time to enjoy the fruits of your labor!
- Carve Carefully: Start with the drumsticks, followed by the thighs and wings. Then, carve the breast meat into thin slices.
- Serve with Garnishes: Arrange the carved turkey on a platter and garnish with herbs, citrus slices, or cranberries for a beautiful presentation.
Ingredients:
- 1 whole turkey (10-15 pounds; adjust for your group size)
- 1/2 cup unsalted butter, softened
- 2 tablespoons fresh rosemary, finely chopped
- 2 tablespoons fresh thyme, finely chopped
- 2 tablespoons fresh sage, finely chopped
- Salt and black pepper, to taste
- 6-8 garlic cloves, minced
- 1 onion, quartered
- 1 apple, quartered
- 1 lemon or orange, quartered
- Extra fresh herbs (rosemary, thyme, sage) for the cavity
Optional Garnishes for Serving:
- Fresh herbs (rosemary, thyme, sage)
- Citrus slices (lemon or orange)
- Fresh cranberries
Enjoying the Perfect Baked Turkey
By following these steps, you’ll have the perfect baked turkey that’s tender, flavorful, and ready to impress. From sourcing your bird at a local farm to carefully seasoning and roasting, each step enhances the quality and taste. This holiday season, gather around the table to enjoy a meal prepared with care and served with gratitude for local farming traditions.